
Black & White Abyssal Ruins guide — all floors, relics and the Relic Crown
Reach every Abyssal Ruins floor with Dive, Flash and Strength, plan around the 500-step limit, collect all 32 relics and sell the complete haul for ₽1,706,000.
Original Black and White; their sequels have different routes and encounter availability.
Items at a glance

Reusable TMs
Generation V makes ordinary TMs reusable.
C-Gear
Several features were designed around connectivity.

Dowsing Machine
Hidden pickups. Use directional clues during exploration.

Lucky Egg
Give this to the Pokémon you are actively developing.

Eviolite
It benefits Pokémon that can still evolve.

Evolution stones
Species-specific evolution. Use the correct stone only after checking the Pokémon’s move-learning plan.
Start in Undella Town with the four field moves
The Abyssal Ruins are the underwater maze in Undella Bay, east of Undella Town. Visit the eastern region after the main story opens it. In original Black and White, the girl outside Caitlin’s villa gives HM06 Dive. Teach Surf and Dive to suitable party members, and also bring Pokémon that already know Flash and Strength before attempting the upper floors. Possessing a TM or HM in the Bag is insufficient if no current party member knows its move.
Surf across the bay and use Dive over one of its four dark water patches. The patches correspond to the north, east, south and west entrances of 1F. Keep track of the entrance used: directions on a floor map refer to the dungeon’s orientation rather than the player’s facing direction. The makes it easier to trace a route before entering. The western entrance is a practical starting point for a direct climb.
Do not wait for Hugh to give Dive or for Zinzolin to provide a translation document. Those events belong to Black 2 and White 2. The original games use the girl’s gift and allow the dungeon puzzle without either sequel character event.
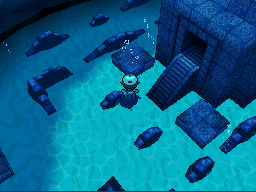
Understand the movement limit before collecting anything
Each entry permits 500 steps across the ruins before a torrent ejects you to the surface. Moving to a higher floor does not provide a fresh 500-step allowance. This is a movement budget rather than a real-time countdown, so pause to study the map and choose the next corridor. The rising warning sounds mean the allowance is running down.
There are no wild Pokémon or trainer battles inside. The main risk is spending the route budget on detours. A forced exit does not erase items already collected, and you can dive back in for another attempt. Repeated trips are expected when emptying the dungeon.
Give each trip a clear objective: a quick crown run, an upper-floor treasure sweep, or a section of 1F. Collecting every visible entrance item on an ascent attempt is tempting, but can prevent the first pillar from opening even while plenty of the overall allowance remains.
1F to 2F: reach the center in fewer than 190 steps
The central purple pillar on 1F is the first gate. Reach it in fewer than 190 steps and interact with it to open the route onward. At 190 or more, that attempt cannot open the gate. This stricter condition is separate from the 500-step ejection limit.
Use a direct mapped route from your chosen entrance and leave optional side passages for a later sweep. If the pillar refuses to move, restarting with a shorter route is more useful than continuing to circle it. Record the forks that caused the detour, return to the surface and approach again. Do not count only the final straight corridor: the entry’s earlier movements matter.
For a first successful climb, avoid all 1F item branches. After the pillar opens, proceed to 2F and preserve the remaining movement allowance for the two field-move gates.
Map legend: blue tiles are paths, yellow tiles are items and pink tiles are gate blocks. Triangles mark the four entrances. A white tile with + leads upward; a white tile with − leads downward. Follow connected blue corridors rather than crossing the black spaces between them.
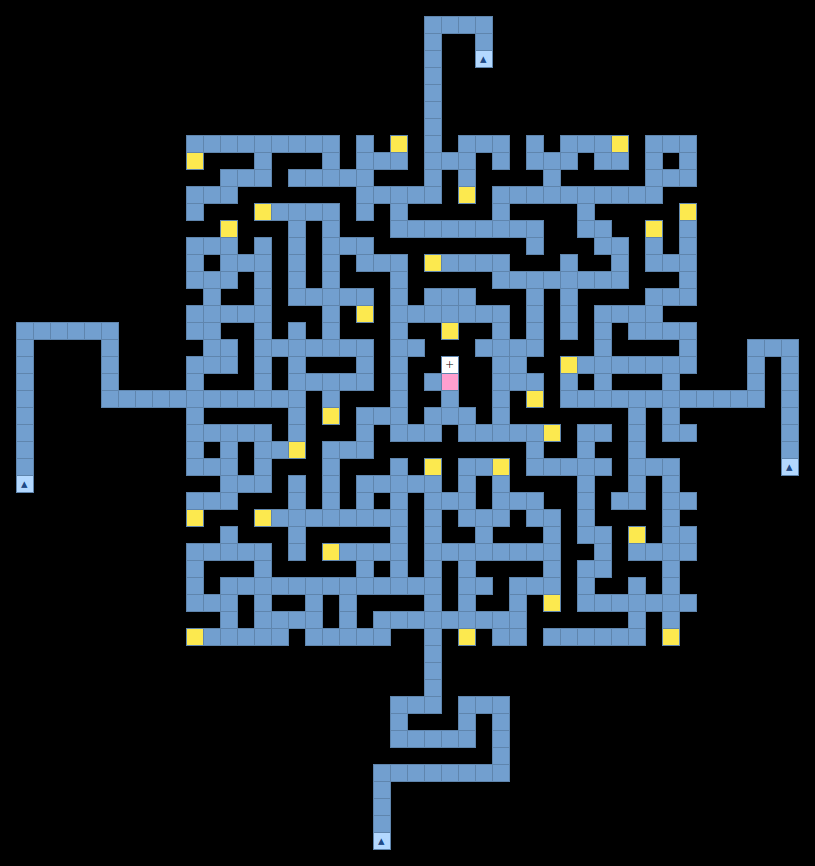
2F to 3F: use Flash at the western purple pillar
From the 2F entrance, follow the maze toward the purple pillar at the dead end in the central-west part of the floor. The begins by going down at the first junction and working around anticlockwise. Keep the floor map open so an item branch does not become a long loop.
At the correct pillar, use Flash from the party Pokémon’s field-move menu. Reading a different inscription or using Flash elsewhere does not clear the intended gate. Once it moves, take the newly opened passage to 3F. On a dedicated treasure trip, return to the table below to decide which 2F branch still contains an item.

3F to 4F: use Strength, then take the central crown
On 3F, the gate pillar is in the central-east part of the floor. Navigate toward the right side while checking the corridor connections on the map. Use Strength at that purple pillar and continue through the opening to 4F. Flash opens the previous floor’s gate; substituting it here does not finish this one.
The fourth floor is a small final chamber with the Relic Crown in its center. Pick up the crown before exploring the surrounding inscriptions. A crown run is successful as soon as the item is in your Bag; you do not need to defeat a guardian or summon a legendary Pokémon. Let the movement limit return you to the surface when you are finished.
If you run out of steps before collecting the crown, repeat the same efficient 1F approach and remove any upper-floor treasure detours. The dungeon does not require collecting the cheaper relics first. These navigation instructions describe the functional gates; the maps supply the exact corridor layout.


All 32 relics: floor totals and sale values
| Relic | 1F | 2F | 3F | 4F | Total | Each sells for | Complete stack |
|---|---|---|---|---|---|---|---|
| Relic Copper | 4 | 2 | 0 | 0 | 6 | ₽1,000 | ₽6,000 |
| Relic Silver | 3 | 2 | 1 | 0 | 6 | ₽5,000 | ₽30,000 |
| Relic Gold | 3 | 3 | 1 | 0 | 7 | ₽10,000 | ₽70,000 |
| Relic Vase | 1 | 1 | 2 | 0 | 4 | ₽50,000 | ₽200,000 |
| Relic Band | 0 | 2 | 3 | 0 | 5 | ₽100,000 | ₽500,000 |
| Relic Statue | 1 | 1 | 1 | 0 | 3 | ₽200,000 | ₽600,000 |
| Relic Crown | 0 | 0 | 0 | 1 | 1 | ₽300,000 | ₽300,000 |
The relic counts are 12 on 1F, 11 on 2F, 8 on 3F and the single crown on 4F. Selling all 32 to the correct buyer yields ₽1,706,000. This calculated total excludes the 14 Plates and all trainer battle rewards. Compare your collection record with each floor’s counts; an empty-looking floor can still have a side branch you skipped.
Relics are finite pickups. They do not respawn after a season changes or after a second crown run. Returning is useful for missed treasures, not for farming another copy of an already collected crown. The crown is worth ₽300,000 by itself, while bands and statues make the upper floors especially valuable.
Sweep 1F for fourteen Plates
| Plate | Type supported |
|---|---|
| Dread Plate | Dark |
| Earth Plate | Ground |
| Fist Plate | Fighting |
| Flame Plate | Fire |
| Icicle Plate | Ice |
| Insect Plate | Bug |
| Iron Plate | Steel |
| Meadow Plate | Grass |
| Mind Plate | Psychic |
| Sky Plate | Flying |
| Spooky Plate | Ghost |
| Stone Plate | Rock |
| Toxic Plate | Poison |
| Zap Plate | Electric |
All fourteen are on 1F. Plates are held items with a battle use, so track them separately from the relics destined for sale. There is no Fairy-type Plate in these Generation V games. Splash Plate and Draco Plate are not part of this dungeon’s fourteen-item set.
A sensible sweep starts from one entrance and clears its nearby branches, then uses another dive patch on the next trip for a different quadrant. Mark each picked-up item on your own copy of the map. A complete sweep has fourteen Plates plus twelve 1F relics; merely reaching the central pillar is not a collection check.
Find the correct buyer in the Riches’ villa
Back in Undella Town, defeat Draco outside the Riches’ villa so he welcomes you inside. The family’s father, represented by a Black Belt, is the relic specialist. Speak to him with the relics in your Bag. Ordinary shopkeepers do not provide the listed relic offers.
Use the prices in this table to verify each offer. Relic Copper is ₽1,000, not ₽2,500; the full haul calculation uses the correct specialist price. You may sell a few relics after each expedition or wait until the collection is complete. Keep your own collection tally if you sell early, since the Bag will no longer show those sold copies.
Draco’s family battles progress across later visits and days, but the escalating family challenge is a separate activity from obtaining the relic money. In the sequels the original villa is demolished and the specialist is in a smaller villa; that relocation does not describe original Black and White.
A practical sequence for complete exploration
- Prepare the party outside: Surf, Dive, Flash and Strength must already be known.
- Make the first attempt a direct crown run. Confirm that the 1F gate opens, then use Flash on 2F and Strength on 3F.
- Pick up the Relic Crown and confirm it appears in the Bag. Return to the specialist to verify the ₽300,000 offer if you intend to sell it.
- Repeat direct ascents for the remaining upper-floor items, clearing a chosen branch on each trip.
- Use the four different entrances for systematic 1F sweeps; do not apply the 190-step goal to a trip devoted only to 1F collection.
- Finish by checking the inventory totals: 32 relics and 14 Plates. If everything was sold, the seven relic-category counts should sum to ₽1,706,000.
This sequence is a suggested collection plan rather than a required order. A player who only wants money can prioritize the crown, bands and statues; a complete item collection requires the cheaper entrance relics and every Plate as well.
Puzzle failures and sequel confusion
| Problem | Check and next action |
|---|---|
| Cannot enter from ordinary water | Stand over one of the four designated dark dive patches; bring a party member with Dive. |
| Central 1F pillar stays closed | The approach used 190 or more steps. Re-enter and follow a shorter route without collecting side items. |
| 2F purple pillar stays closed | Find the central-west dead end and use Flash there. |
| 3F purple pillar stays closed | Find the central-east pillar and use Strength there. |
| Torrent ends the expedition | The 500-step allowance expired. Collected items remain yours; dive again for unfinished branches. |
| No Pokémon appears at the crown | The original ruins contain no Pokémon encounter or boss. |
| Zinzolin never arrives to translate | His translation-document event is a Black 2 / White 2 feature. |
| Cannot sell relics at a Mart | Speak to the Black Belt specialist in the Riches’ original villa. |
Keep game mechanics separate from the anime’s underwater temple story and from fan theories about the ancient king. Neither Meloetta, the Reveal Glass nor Therian Formes are requirements for exploring this dungeon in original Black and White. For the actual legendary encounters elsewhere in Unova, use the legendary and event guide.
A crown run must satisfy two limits: fewer than 190 steps to the first pillar, and fewer than 500 steps across the whole expedition. Collect side treasures on repeat trips.
References
- Bulbapedia — Abyssal Ruins
- Bulbapedia — Undella Town
- Serebii — original Black and White abyssalruins
- Pokémon Database — four-floor Abyssal Ruins maps
- Gamer Guides — original Abyssal Ruins walkthrough
- Bulbapedia — Item maniac
- Bulbapedia — Relic Copper
- Bulbapedia — Relic Silver
- Bulbapedia — Relic Gold
- Bulbapedia — Relic Vase
- Bulbapedia — Relic Band
- Bulbapedia — Relic Statue
- Bulbapedia — Relic Crown
- Bulbapedia — Plate